Learn about your NVG510
Get details on using your NVG510 to connect to the internet and find help for common issues.
You’re viewing instructions for
Internet equipment
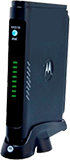
Motorola
NVG510
KM1050512-slctrgrp_motonvg510
Status lights
Every light on your Wi-Fi® gateway has a meaning. Learn what each light means and how to use them to troubleshoot common issues.
Power light
- Green (solid): Power is on.
- Green (flashing): Power-On Self-Test (POST) is in progress.
- Red (flashing): A POST failure (not bootable) or device malfunction occurred.
- Off: The unit has no AC power.
Ethernet light
- Green (solid): A computer or device is connected to an Ethernet port.
- Green (flickering): There’s activity from a device connected to an Ethernet port. The flicker is synchronized to data traffic.
Wireless light
- Green (solid): A computer or device is connected by Wi-Fi® to the gateway.
- Green (flickering): There’s activity from a device connected through Wi-Fi. The flicker is synchronized to data traffic.
- Off: Wi-Fi isn’t in use or there isn’t power to the gateway.
Wi-Fi Setup
- Green (flickering): WPS is broadcasting.
- Off: Wi-Fi isn’t in use or isn’t broadcasting.
Broadband
- Green (solid): The gateway is connected to our network.
- Green (flashing): The gateway is trying to connect to our network.
- Green & red (flashing): The gateway has been trying to connect to our network for more than three minutes.
- Red (flashing): The gateway can't connect to our network or isn’t detecting a DSL signal.
Service
- Green (solid): The gateway has obtained an IP address from our network. The connection is active.
- Green (flashing): The gateway is attempting PPP connection, attempting IEEE 802.1X authentication, or attempting to obtain DHCP information.
- Red (solid): Internet service authentication has failed.
- Off: The gateway doesn’t have power, or there’s no connection to the broadband network.
Phone 1, 2 light
- Green (solid): A phone is connected and registered.
- Green (flashing): A phone is off the hook on the associated line.
- Off: VoIP not used, line isn’t registered, or gateway power is off.
Status lights during firmware upgrades
Firmware updates keep your Wi-Fi gateway running smoothly. During the software installation, you’ll lose internet and phone service. The lights will function as follows:
- As firmware is being loaded into flash, the lights will operate normally as described.
- The installation will take a few minutes. During this phase, the Power light will be solid green, the Ethernet light will be solid green, and the rest of the lights (Wireless to Phone 2) will flash solid green one after the other moving from top to bottom and then bottom to top.
The gateway will restart automatically. As the it restarts, the POWER ON light behavior will happen.
Wi-Fi info
Find Wi-Fi info
Get your Wi-Fi® name and password to connect devices to your network:
- Wi-Fi gateway: Look for a sticker with your Wi-Fi name and password.
- QR code: Use your mobile device to automatically connect devices to your hub.
- Smart Home Manager: Open Smart Home Manager and look for My Wi-Fi.
Change Wi-Fi name
- Sign in to Smart Home Manager
- Scroll to the My Wi-Fi card and choose Change next to the name or password.
- Select X to clear existing info, then enter a new name or password.
- Select Save.
Once you finish making changes, reconnect your devices with the updated network info.
FYI: You can also update your Wi-Fi from your Wi-Fi gateway settings.
Manage Wi-Fi security
Your AT&T Wi-Fi gateway comes with the security On and set to WPA (Wired Equivalent Privacy) by default. If you have changed the security to OFF, follow these steps to turn it back on.
- Go to your gateway settings.
- Select Home Network, then Wireless.
- Scroll to the Security section and select WPA-PSK from the dropdown.
- Enter a new Wi-Fi password (Wireless Key) in the Key field.
- For 64-bit encryption, enter a 10-digit password made up of numbers and letters a-f or A-F.
- For 128-bit encryption, enter a 26-digit hexadecimal number made up of numbers and letters
a-f or A-F. - Enter the Modem Access Code in the Password field. You can find the code on your gateway.
- Select Save.
Advanced settings
Hide Wi-Fi info
Important: Before following these steps, be sure to store your Wi-Fi network name and password in a safe location. You’ll have to manually enter them after your network name is hidden. Then, choose your equipment type to get detailed instructions.
- Go to your gateway settings.
- Enter the Modem Access Code found on your Wi-Fi gateway.
- Select Home Network.
- Go to the Wireless section and select On from the Hide SSID drop-down.
- Select Save.
MAC address filtering
Set up your Wi-Fi gateway so that it only connects to devices by MAC address. This makes your connections more secure. When you turn on MAC address filtering, only devices that you select can connect to your network.
FYI: Make sure you have the MAC address for each device you want to access your Wi-Fi home network. Every device will have its own process to find its MAC address. Check your service documentation or manufacturer’s website for detailed instructions.
- Go to your gateway settings.
- Enter the Modem Access Code found on the side of your gateway.
- Select Home Network, then Mac Filtering.
- Open the MAC Filtering Type dropdown, then select Enabled.
- In Mac Filter Entry, either:
- Select your devices’ MAC addresses
- Enter the MAC address in the Manual Entry field
- Select Add and then Save.
Port forwarding
Important: Use port forwarding with caution. It may allow others to access devices in your home without your knowledge.
To open a port for user-defined applications:
- Go to your gateway settings.
- Select Firewall and then NAT/Gaming. If you get a warning message, restart your Wi-Fi gateway. Then, continue with these steps.
- Select Continue.
- From Service, select the application for port forwarding. If your application isn't in the list, or you're setting up port forwarding for a device:
- Select Custom Services.
- Enter the name for the application or device In Service Name.
- Enter the port(s) you wish to open for Global Port Range. It's recommended to create a separate service entry for each port as opposed to using a port range. In this case, the port number should be the same in the Global Port Range fields.
- Select the appropriate Protocol from the drop-down for the application or device you're adding.
- Select Add. Repeat as needed for additional applications and devices.
- When all applications or devices have been added, select Return to NAT/Gaming. Your new applications or devices will display in the Applications list.
- From Needed by Device, select the device name or IP address of the device to open the port.
- Select Add, then Save when your selections display in Hosted Applications.