Advanced Photo & Video Features
Learn how to access and use Camera modes, effects, customization, and crop a photo.
![]()
In this tutorial, you will learn how to:
• Access camera modes
• Customize photo and video settings
• Turn shutter sound on/off
• Crop a photo
• Access filters
• Use Magic eraser
• Use Photo Unblur
• Use Magic editor
• Use Add Me
Access camera modes
From the Camera app, swipe left or right to access modes such as Night Sight, Portrait, Long Exposure, and Panorama. Select the Video Icon then swipe left or right to access modes such as Time Lapse, Slow Motion, and Pan.
Note: Night Sight allows you to take pictures in the dark. Portrait captures a picture with a sharp subject against a blurred background. Long Exposure applies a creative blur to all moving subjects. Panorama allows you to create wider photos by stitching together multiple photos. Time Lapse allows you to capture videos and play them back at a fast playback speed. Slow Motion allows you to capture videos and play them back at a slow playback speed. Pan stabilizes your phone movements when taking video. 
Customize photo and video settings
From the Camera app, swipe up to access settings or select the Camera settings icon. Edit settings as desired. Select More settings to access additional camera settings.
Note: Settings vary depending on the camera mode.
Turn shutter sound on/off
From the Camera settings screen select More settings, then select the Camera sounds switch.
Crop a photo
1. From the Camera app, select the Gallery icon. Swipe left to the desired photo, then select the Edit icon.
Note: Alternately, from the home screen, select the ![]() Photos app, then navigate to and select the desired photo.
Photos app, then navigate to and select the desired photo.
2. Select Actions, then Crop. Select and drag the crop corners to crop as desired, then select the Checkmark icon.
Access filters
While editing a photo, on the bottom of the screen swipe left to Filters. Select the desired filter, then select the Checkmark icon to apply.
Note: Google Photos Real Tone is a collection of filters that allow skin tones to be captured more accurately. Try out the Playa, Honey, Isla, Desert, and Clay filter.
Use Magic eraser
1. While editing a photo, on the bottom of the screen swipe left to Actions, then select Magic eraser. Circle or select any area on the image to erase.
2. While editing with the magic eraser tool, select the desired option:
• RESET: Select Reset to revert the image back to its original state.
• UNDO: Select the Undo icon.
• REDO: Select the Redo icon.
3. When finished, select the Checkmark icon.
Use Photo Unblur
1. While editing a photo, on the bottom of the screen swipe left to Actions, then select Denoise. Swipe left or right on the unblur slider to adjust effect strength as desired, then select the Checkmark icon.

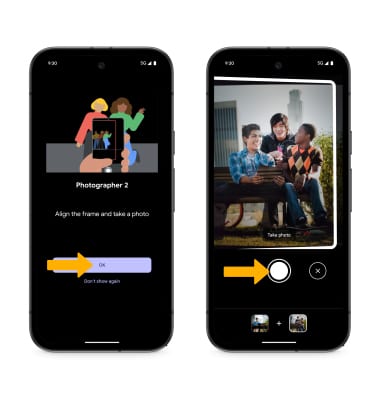
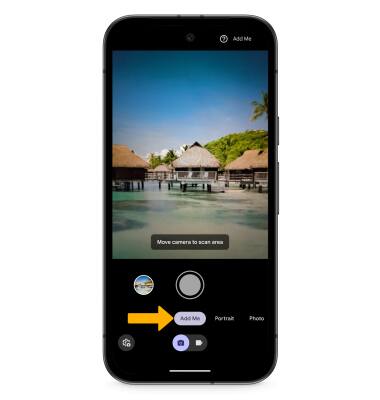
Use Add Me
1. Forget about selfie sticks or needing a helpful stranger. Add Me can seamlessly merge two photos into one amazing image. It combines true-to-the-moment photography with the power of AI and augmented reality, so everyone who was there can be in your pictures. From the Camera app, select Add Me.
2. Review the prompt to take the first picture, then select OK. Leave space for another person to fill in the next picture. Select the Shutter icon to take a picture.

3. Review the prompt to take the second picture, then select OK. Align the frame so that it matches the previous photo, then select the Shutter icon to take a picture.
Note: The newly created group photo will automatically be saved to the Photos app.